Thursday, September 15, 2011

Lovin Me Some Minky

It was love at first touch, me and minky. I was at a quiltig shop in Orem, looking for inspiration for J's first baby blanket. The moment I laid my fingertips on it I fell for the incredible softness & wished I could just cuddle with it all night long. I could just imagine snuggling a sweet baby in softness and being in love with both my little lamb and the blanket. So I made lots of minky blankets.


I know, 4 is not equivalent to tons and bunches, or even lots. But I have plans to make more. Oh do I ever. And to take better pictures of them. My particular favorites are the pink damask and the dinosaur ones. The prints are flannel and the backs are minky - extra specially cuddly! Another one of the best things about minky blankets is that they are warm and lightweight without being bulky. Perfect for keeping little ones cozy this fall and winter.

Wednesday, September 14, 2011

The Cutest Little Things

I finally learned how to crochet some cute little booties! These are baby Mary Janes. I think they are adorable with the little button at the end of the strap.


They are also the first pair I ever made. I wanted to document how well this experiment turned out for me. Usually my first attempts are pretty miserable. Like my first attempt at steaming an artichoke. I set the stove on fire. The second time I tried to steam an artichoke, I melted the pot on the stove. I haven't tried that experiment again. But I did make some more booties in a more girly color. Mary Janes are more of a girl shoe. And pink is a more girly color than brown. These came out even better than the first pair.


Love them! I think these little things are possibly the cutest thing I have ever crocheted.  

Tuesday, September 13, 2011

Family Pictures

I make crocheted photoprops. Sometimes I trade my creations for services. Renee over at LaRee Photography and I made an exchange. Here are some of my crochet creations she's used.


We had her take our family photos this summer. She does a great job with family pictures and she is very reasonably priced. You should go check out her blog! And then have a look at the pictures she did for us. I am happy with the way they turned out.


Friday, September 9, 2011

Sneak Peek

I am currently obsessed with two things. The first is reading waaaaay too many blogs. The second is completing my current project. Here is what my sewing desk looks like at the moment.


Any guesses as to what I'm making?


Thursday, September 8, 2011

Baby Burpie Tutorial (Posh Burpies!)

My babies spit up. A lot. Both S & J were born with acid reflux. Each went through several outfits daily. Not to mention burp cloths! We had an entire section of the diaper bag reserved for burpies, and I made sure never to leave the house without a minimum of three!

I've decided that being a mom doesn't mean you have to be frumpy. This means that burp cloths don't have to be drab. This is a tutorial on how you can make fabulous, stylish, functional burpies for your baby.


Here's what you need to make super cute burpies:
Fabulous Fabric
Matching chenille fabric
Basic sewing stuff (self healing cutting mat, large quilting ruler, rotary cutter, matching thread, a sewing maching, some pins, and scissors)


I used Michael Miller's flannel Dandy Damask in Cotton Candy and a Michael Miller flannel dot also in Cotton Candy, and white chenille for the back. I order my chenille from fabric.com. It usually comes in 58" wide yards.

~ You can make these using fat quarters, or you can cut the fronts and backs out of larger amounts of fabric. The bonus of fat quarters? No measuring or cutting! sweet. ~

Here's how you make them:

Cut out a rectangle 14" wide by 20" long of your fabulous fabric & another one the same size out of your chenille.

Here are some cutting diagrams. I drew them in Paint. Since I am not a drawing kind of artist, they are probably way off scale, but they will give you an idea of how you can get the most burpies out of a yard of fabric.


Once you have your fronts and backs cut out, pin the two rectangles right sides together & sew around the edges using a 1/2" seam allowance. Make sure to leave an opening to turn it right side out.

Turn your burpie right side out. Fold up the edges of the hole & sew the opening shut.

Top stitch around the entire burpie 1/4" in from the edge. Top stitch again 1/2" in from the edge. Your two rows of topstitching will be 1/4" apart. Topstitching twice gives the burpie a nice finish and improves the durability.

Voila! You've done it!


Wednesday, September 7, 2011

Summer Vacation 2011

We spent a week on the road, drive drive driving to pretty amazing places.

We went to Mesa Verde National Park in Colorado. The cliff dwellings are awesome.

We visited Four Corners National Monument while we were in the neighborhood. Spencer and I always spread our arms out front to back when we cross the Utah/Idaho border so we can be in two places at once. Here he is in four places at once.


Hubbie got a little creative with his four corners posing.


Then we were off to the North Rim of the Grand Canyon. If you haven't ever been there, go! And spend more than just a couple of hours there. This place is awesome. It is just amazing to me that there could be a place so deep on earth - that doesn't even reach the middle of the earth. It goes down for ever - you can't even see the bottom of it unless you hike down - and it stretches on for as far as you can see. It was kind of a hazy day, so visibility was a little limited. I wish I had been able to stay there longer, until the evening came and the clouds went away. That would have been a better picture.


We went to a cave that someone had purchased and turned into a dance hall, which someone else purchased and turned into a museum. It was more wierd than museum. But, it was a naturally cool escape from the late August heat of the desert.


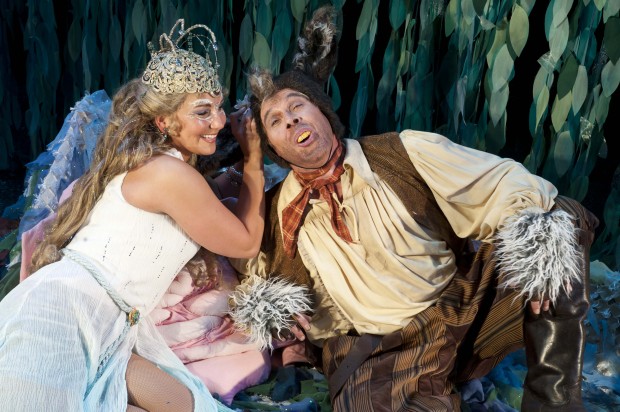
The last stop before we headed home was Cedar City, UT. There is a Shakespeare Festival there every year. 2011 is the 50th anniversary of the festival. We went to see Midsummer Night's Dream. It was by far the funniest production I have ever seen. I laughed even harder than I do at Comedy Sports Club. Seriously. Until I cried. Good times.

Source


And finally after all that fun, we headed to our sweet little home. 

Tuesday, September 6, 2011

Newsboy Hat - Girlified!

Crocheted newsboy hats are so cute! I used this one I made during a photoshoot of my friend's adorable new baby boy.


And then I thought that my nieces might want one to keep them cozy during the fall and winter season. So I girlified the newsboy hat.


Isn't that flower so much fun? I love how gigantic it is! I wish my little nieces were closer - I can't wait to see it on them.


Part of me thinks that maybe I want one to keep warm during the crazy cold weather we get here. Remember those flower ear warmer things from last year? I did make a few, but the top of my head got cold. I would love a flowered beanie to stay cozy during the bitter cold of Utah. I just might make myself one.