Monday, January 30, 2012

DIY Eye Makeup Removal {A Pinterest Project}

Once upon a time, as I was perusing Pinterest, I came across the idea to make my own eye makeup remover.

Pinned Image
kristanlynn.com
Someone had found a recipe for eye makeup remover here in blogland and shared it on Pinterest. (My cousin's friend also has a recipe for eye makeup remover. Visit her blog,  A Lighter Journey, for her recipe and many money saving ideas!) What a good idea! I usually avoid washing my face before bedtime because my mascara and eyeliner get smudged all over the place and I find it in my pores the next morning. (gasp! I know. Some people say that a woman ages seven years for every night she doesn't wash her face. I don't believe those people -gasp again! I know. But if it were true, I'd look like I was 100 years old....and I don't think I look like I'm quite that old yet) Nevertheless, no matter how I try to avoid it, I always end up washing my face at night. I get into bed and get all snuggled up and then...dun dun dun...my eyes begin itching. The only way to make the itching go away is to get out of bed (and get cold again) and wash my face.

It hasn't always been this way. I used to purchase Clinique's Take the Day Off Makeup Remover, but have avoided the price of it lately. And so, I've been in the conundrum of black pores vs itchy eyes for quite a stretch. I decided that making my own eye makeup remover would be the solution.

Until I thought of a different problem.

Cotton balls. Those little white balls of fluff shed and the fibers get in my eyes. I don't like using cotton balls. What else should you use with eye makeup remover?

These!


Alli Crafts is a crochet blog with lots of useful free patterns. These are Alli's eye makeup remover pads.  These are my answer to cotton balls. I modified the pattern to reflect my own personal preferences and tastes (I really dislike the look of the double crochet stitch in anything) and made some of my own. I also used Kristin's formula for home made eye makeup remover. And now I can wash my face at night. No itching eyes. No straggly strands of cotton balls stuck in my eyes. No black pores. (and no looking seven years older every morning...if you believe in that sort of thing)
YAY!! I can get in bed, snuggle down in my covers and not have to get out and get cold anymore.....or at least for a few hours until my alarm clock wakes me up.

Here is my own eyemakeup battle remover kit


These little eye makeup remover pads work really well. I find that when they are made out of cotton yarn, they are soft and not at all abrasive to my skin. They also wash well, so my mascara doesn't stain them. I just throw them in my washing mahine with my towels. So far, so good.


I made a bunch of them (more than pictured here) because I....want to do laundry more often.


I also made coordinating washcloths. I think the pattern is really pretty and modern. Pretty, modern, and functional.


So, thank you, fellow Pinner, for putting this miracle answer to my every night problem on Pinterest. I am so glad you did!

More Petit Lambie Love

I sometimes get requests to make items that are not for sale in my shop. Like this cute little bear hat.


This is the second time I've been requested by a photographer to make a bear hat for a photoprop. And I haven't made any to sell in my Etsy shop. Silly the moi. I think I should get the hint. Bear hats coming soon to Petit Lambie!

Sunday, January 29, 2012

One Decision Down

I have chosen the flooring for my house! Part of it, anyhow. This is monumental progress in my book. It took days and weeks of dreaming, looking, pricing, and dreaming some more to make a single choice.

The house had hardwood floors when we purchased it. Everyone wants those, right? The problem with the floors in this house is that the upstairs living room and hallway were done in a blood red cherry wood, and the bedrooms upstairs were done in a very light blonde bamboo. High contrast, right! And the transitions were done very poorly - you could see stripes of blonde bamboo at each bedroom doorway down the hall because they installed it up to the outside of the door jamb. We looked into what it would cost to just have them stripped and refinished to being the same color and found that it would be less expensive to replace it all.

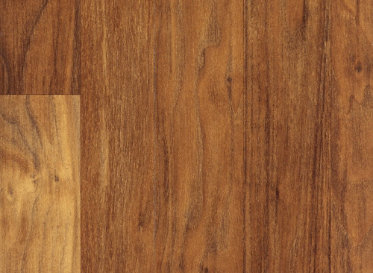
This is the laminate wood we have decided to install for the upstairs living room, kitchen, hall, and bedroom floors.


It is called Marble Falls Teak. Had it fit in my budget, I would have liked to go with something a little bit darker and more rustic in walnut, but I really like this flooring. It was on sale and I had a coupon. Score! (Lumber Liquidators got the price even lower for us when Doug went in to negotiate with them) Definately an improvement from what was in the house when we bought it. Also an improvement from what is in there now. Though what is in the house now is a HUGE improvement from what used to be there. Doug has all of the floors ripped down to the subfloor. Believe it or not, the subfloors actually look better (and are much cleaner) than the floor that was there. Even so, subfloors aren't the prettiest. Those ugly subfloors will get covered up with new laminate flooring as soon as we get a fresh new coat of paint on the walls (or maybe 10 coats of paint...they desperately need it!)

Ug. I still have to choose paint colors. I've been looking for them for three months and haven't come any closer to deciding than the first day I began. But, stay tuned. I may eventually pick something out. Pinterest has given me many many ideas.

Saturday, January 28, 2012

House Update

We got it! It didn't happen as quickly as we would have liked....but it didn't take this long either. Nope. We actually purchased our new 5 bedroom, 2 bathroom, 2 car garage home in December. And we've been renovating it ever since. It needs a TON of work. See for yourself.

This is a wall in the "finished" basement kitchen


Another "finished" wall in the basement


The laundry area (it is in the downstairs kitchen)


Peel and stick tiles in a lovely shade of blech (downstairs kitchen)


The dirtiest, ugliest carpet I have ever seen in my life. It was bright emerald green and had never ever been washed or vacuumed. This is the entrance from the downstairs kitchen into the downstairs family room. Ew.


I will just leave it at that so that my blog doesn't completely repulse you. *Sigh* There is a LOT of work to be done. Husband has been working on it after work every night, on his days off, and through the weekend. It is going to take a while. A while is a good and bad thing. Good because I am having the hardest time picking stuff out. Mostly because I like too many things and it is hard to narrow it down to just a few. I promise the next time I post about the house, you'll see better looking photos!


Why would we buy a house that needed so much work? Our condo was in good condition, and we could have easily made it fabulous instead of coming up with an insane amount of money to put down on a dump. The reason is simple. It just made more financial sense for us. Our mortgage for this house is much less than the mortgage on the condo, and there are no HOA fees. We are saving about $500 a month in this house. We also have instant equity in this home. It appraised for a significant amount more than what we paid for it. Even in the condition it was in when we purchased it. So we get a bigger (about twice as much space as the condo), detached house that we can customize to our style for less. Score!! As far as we're concerned, this house is a diamond in the rough. I'm glad my husband has carpentry skills and vision. We are both excited to turn this into a comfortable aesthetically pleasing home for our family.

Friday, January 27, 2012

My Latest Addiction

I am usually the last one to get on the boat with technically savvy or popular internet things. Seriously. I was rocking the same cell phone for five years. It was an LG NV2 and I really really disliked it for the entire time I had it. It could do cool stuff (supposedly) but I never used any of the cool features. Well, it did read my texts out loud to me, which I thought was pretty funny and used quite often. But I never used the micro SD card to load music onto my phone (isn't that what an iPod is for?) I never used Vcast or Vnavigator. I didn't even do picture texting. I just used it for calling and texting. Nothing more. But I digress. I finally have a smart phone with a touch screen and a data plan, and I can use some of the cool features on it. I mostly use it for my latest addiction. (not really, it just seemed like a good transition sentence into what my addiction really is)

Pinterest. (well..and playing Jewels on my phone)

I totally love this website. I have found so many wonderful ideas and have learned a LOT from the knowledge that everyone is willing to share there. I've created several dream boards, and hope to someday get to actually making some of the projects I've pinned. So many! Seriously, my to-do list is as long as the Great Wall of China now ( I just typed the word 'seriosly' again. I seriously need to find another word to mean 'seriously')

The site has been really useful in helping me come up with affordable ways to cosmetically update my house. (You know, the one we bought and have been renovating, and haven't moved into yet. Oh? I haven't posted much on that lately? Woops. I guess I have been spending too much time on Pinterest!)

If you haven't checked Pinterest out, go! You'll find tons of stuff on the things you love and are interested in. It will get you hooked on dreaming.

Appreciation Photos

A customer ordered a custom newsboy hat in light blue & wanted to share a picture from the photo shoot she ordered it for. How sweet!! Thanks for sharing!

Wednesday, January 18, 2012

DIY Toddler Bib

Jaden has entered his terrible terrific two-year-old stage. This means that he is beginning to assert his independence by voicing his own opinions. One thing he particularly insists upon is feeding himself. I am not allowed to help him. At all. Not even by cutting up his food into bite-sized peices. (In his opinion, a full sized Snickers bar is bite-sized, not the tiny actually bite-sized peices). He won't even allow me to help him eat hard to spear with a fork foods. As you can imagine, meal times have become very very messy. Messy meals are a problem when you only have two toddler-sized bibs....I mean bibs big enough to handle toddler-sized messes....especially when those two bibs are Halloween and Thanksgiving themed and those holidays are long since over. The solution? Make more bibs. Like this.

Gather your supplies. You will need:
*A bib that currently fits your toddler
*Fabric for the front and back of the bib
     For the front of my bibs, I used 3 fat quarters from Robert Kaufman's Airplanes, trains, and cars collection. The colors and designs are darling and totally boy, plus the fabric is 100% organic cotton (so be sure you wash it before you cut and sew it). I used plain white cotton flannel for the back of my bibs.
*Newspaper or other large sheet of paper
*Velcro
*Scissors, matching thread, pins, a pencil, and a sewing machine.


Since I didn't have a pattern for a bib, I made my own simply by tracing the Halloween one I already had onto a page from the newspaper. When you trace your bib, be sure that you add 1/4 of an inch to the outside edges of the bib so that you have a seam allowance when you go to sew it together. If you forget to add the seam allowance, your bib may turn out smaller than you want.


After your pattern is made, pin it to your fabric and cut it out.

Cutting out the back and the front


You can probably cut the back and the front out at the same time if you want to. I cut them separately when I made my first bib. Since I was making three bibs in one day, I found it faster to cut everything out at the same time & didn't notice that it made much of a difference in the size or pattern of each peice.

Before you put the right sides of the front and back peices together, you need to pin the velcro on. It will go in the upper right hand corner on the right side of each peice.

This is where the velcro should be when you're finished.

I had to use two strips of velcro to get the width I wanted. There was a very limited selection at my local hobby store. I will try harder to find wider velcro in the future. This works in a pinch, though.


After you have your velcro pinned where it belongs you can put the right sides of the front and back peices together, pin them in place, and then sew. Make sure you leave 2" opening along the bottom edge so you can turn your bib right side out.


Use a 1/4 inch seam allowance. Measure where that would be on your sewing machine and align your fabric accordingly. I always have to do this because I am a ditz and forget which markings on my machine are for which allowances. Silly moi, I know.


REMEMBER (as in DON'T FORGET) to leave an opening on the bottom edge so that you can turn your work right side out. I mark my opening with two pins side by side on each side of the opening I want to leave so that I remember not to forget to leave a whole.

After you've sewn around the edges of your bib, trim the curve around the neck and the corners, and then turn it right side out. Press the bib flat.


What about that opening? It is easy to deal with. My preferred method is to fold the fabric under 1/4 of an inch and iron it flat, making sure that the edges of the opening line up with the sewn edges of the rest of the bottom edge. I close the opening when I topstitch around the whole bib....which is the next step.

After you've ironed the opening in the bottom edge, topstitch as close to the edge as possible around the entire bib. This will look great and make sure that you've got that opening closed.

Here is the finished product.


Monday, January 2, 2012

2011 Reflections

I don't think I can recall 2,011 things about the year 2011, mostly because I don't have a good enough  memory to recall that many things. My memory is just good enough to recall the best things about the last year. Read on for proof ;)

January commenced my final semester of college. Yay! I found a guilty pleasure in getting out of the house a few nights a week to attend classes and be in the company of human beings other than my little son and my husband.

In March, Little Son had surgery to open his clogged tear duct. We were constantly fighting to clear out eye goobers day in and day out until after the surgery. Bye-bye eye goobers, yay! And in April, Little Son celebrated his first birthday.


In April we graduated, WOHOO!! My parents came from Ohio to celebrate with us. My dad gave me my Canon DSLR camera & I began to learn about photography.


We celebrated our second wedding anniversary in May with a couple's massage and a dinner at a 5 star restaraunt followed by a long drive in a vintage convertible Corvette.

Oldest Son came to visit for the summer. My two boys just love love love each other!


Petit Lambie has grown. I started a Face Book page for it, and made some Etsy sales. Super excited about that!

I discovered Pinterest. Wowzers. My list of things that I would like to do someday has grown exponentially. I love Pinterest. Seriously. I am always impressed by the new ideas and creativity along with some sensible tips for almost everything. It is a wonderful community for sharing inspiration and knowledge.
 And then we decided to move out of our condo and purchase a house. I'm still not sure how that happened! Just like how I'm not sure how 2011 has come to an end so quickly.

 Well...my memory is good enough to help me remember that I once learned that Earth travels around the sun and spins on an imaginary axis and somehow time passes and voila! a new year begins. My memory can't help me understand how time passes so quickly. However much I can't remember or don't understand, I know that 2012 will bring many memorable experiences which I will document with my camera so I don't forget!

Things I am looking forward to in 2012:

Going to Disney World (a.ka. learning how to travel with a toddler -EEK!- but really, it should be legendary!!)

Finishing our house
Moving into our house
Working even more on our house
Posting some tutorials
Introducing new Petit Lambie products
Spending more time with more family.

Hoping your 2012 brings you blessings and happiness!